This easy pie dough has a recipe that pastry chefs tend to favor, but it doesn't require any fancy ingredients, equipment, or training. Just smash some cold butter in a bowl of flour, stir in a bit of water, roll it out, and fold it over a few times. It's essentially a streamlined blitz, making an easy, layered dough that's supple but strong. That means it won't slump out of shape in the oven, so it can support all types of complicated decorative techniques, but it's wonderfully buttery, so it always turns out flaky and tender, too.
Notes
Compared to stoneware or heavy enameled ceramic, tempered-glass pie plates conduct heat quickly and evenly, so the crust bakes up light and crisp, never greasy or soft. When room temperature exceeds 74°F (23°C), kitchen equipment and pantry staples will act as a heat source to the butter, creating a sticky dough. If it’s warm in your kitchen, take these proactive steps to manage your dough temperature.
The dough can be made ahead of time and refrigerated for up to 24 hours before use. To store it for longer than that, the dough can be frozen as a block, rolled, or shaped in a pan. If frozen as a block, dough will still need to rest/relax for at least 2 hours after rolling and shaping.
- The first and easiest step is to toss everything in the fridge, including your bowl, rolling pin, pie plate, the "dry mix" (flour, sugar, salt) of your recipe, and the water in its measuring cup.
- If it's truly hot in the kitchen, your countertop itself is the enemy, a source of heat to every square inch of dough. Divide several cups of ice between two gallon-size zip-top bags, add a little cold water to each, seal tight, and lay flat until the counter below is nice and cool.
- Use an instant-read thermometer inserted into the stack of folded pie dough and aim to keep the dough around 65°F, any colder and it won't behave as it should.
- Flour generously. I'm not talking about a pinch or a sprinkle, but entire handfuls, tossed above and below. This will keep the dough from sticking as it's warmed and smashed between the counter and the pin. You can always dust away excess flour with a pastry brush, so don't be shy!
- Remember, these steps are simply meant to counteract excessive heat in the kitchen, so you may not need them all. Just being aware of how the temperature of your ingredients and equipment can impact a dough will go a long way toward helping you avoid the frustration of wrangling a sticky mess. Keep the dough temperature between 65 and 70°F, and rolling it out will always be a breeze.
The dough can be made ahead of time and refrigerated for up to 24 hours before use. To store it for longer than that, the dough can be frozen as a block, rolled, or shaped in a pan. If frozen as a block, dough will still need to rest/relax for at least 2 hours after rolling and shaping.
Ingredients
- 8 ounces low protein all-purpose flour - such as Gold Medal Blue Label (1 2/3 cups; 225g), plus more for dusting
- 1/2 ounce sugar - 1 tablespoon; 15g
- 1 teaspoon Diamond Crystal kosher salt - 4g; for table salt, use half as much by volume or use the same weight
- 2 sticks unsalted American-style butter - straight from the fridge (8 ounces; 225g), cold
- 4 ounces cold tap water - 1/2 cup; 115g
Instructions
For the Dough:
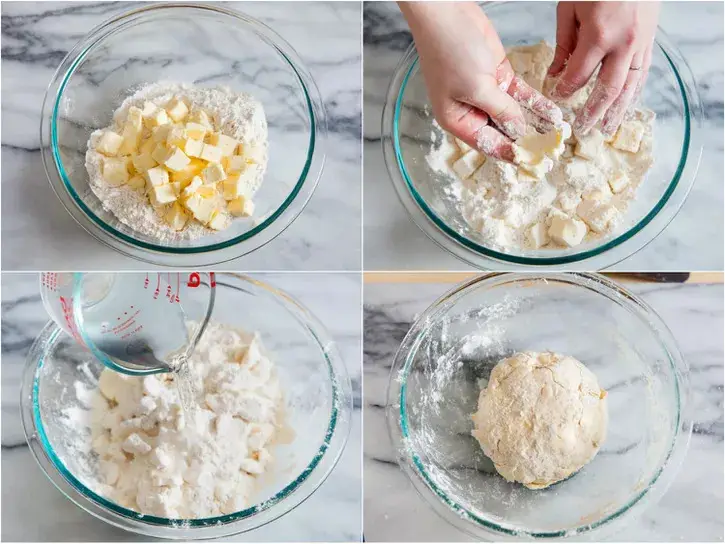
- Whisk flour, sugar, and salt together in a medium bowl.
- Cut butter into cubes no smaller than 1/2-inch, and toss with flour mixture to break up the pieces.
- With your fingertips, smash each cube flat—that's it! No rubbing or cutting.
- Stir in water, then knead dough against the sides of the bowl until it comes together in a shaggy ball. Dough temperature should register between 65 and 70°F (18 and 21°C); if not, refrigerate briefly before rolling and folding (see note).
Make the Layers:
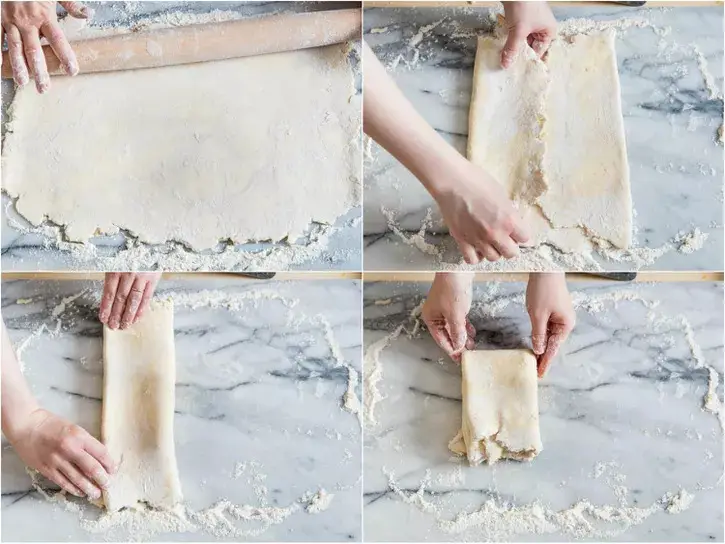
- On a generously floured work surface, roll dough into a roughly 10- by 15-inch rectangle.
- Fold the 10-inch sides to the center (to create the first two layers, then close the newly formed packet like a book to create 4 layers.
- Fold in half once more, bringing the short sides together to create a thick block.
- Divide in half with a sharp knife or bench scraper. Dough temperature should still be somewhere between 65 and 70°F (18 and 21°C); if not, refrigerate briefly before proceeding (see note).
For Both Single and Double-Crusted Pies:
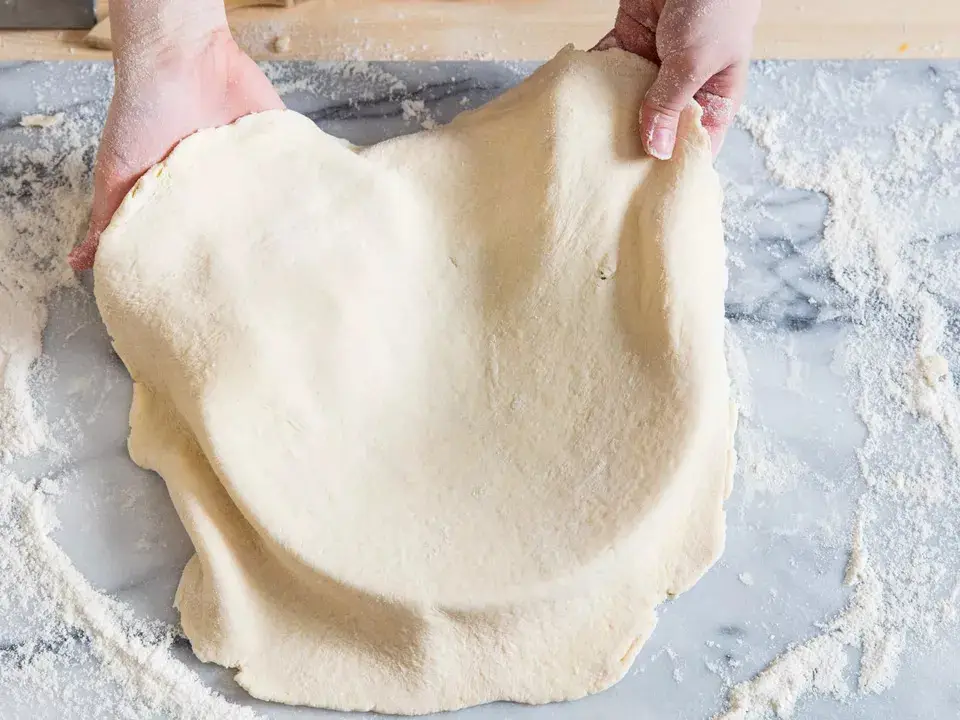
- Using as much flour as needed, roll one piece into a 14-inch circle; this size allows ample room to line the pie plate, with enough overhang to form a generous border. At smaller sizes, the dough will fall short, making it difficult to shape the edges, and the thicker dough will not crisp as intended.
- Transfer to a 9-inch pie plate; the dough should be easy to handle, and will not require any special procedures to move.
- Dust off excess flour with a pastry brush, using it to nestle dough into the very corners of the pan.
- With scissors or kitchen shears, trim the edge so that it overhangs by 1 1/4 inches all around.
For Single-Crusted Pies Only:
- Fold overhang over itself to create a thick border that sits on the top edge of the pie plate, not below.
- Crimp or shape crust as desired.
- Repeat with remaining dough.
For a Double-Crusted Pie Only:
- For a solid top crust, roll remaining dough as before; for a lattice-top pie, roll into a 9- by 15-inch rectangle instead.
- Transfer to a baking sheet or parchment-lined cutting board. (The parchment will prevent dough from absorbing any savory odors from the board.)
For Both Single and Double-Crusted Pies:
- Wrap both portions in plastic and refrigerate at least 2 hours and up to overnight.
- Use as directed in your favorite recipe; after filling the pie and sealing the crusts together, refrigerate 30 minutes before baking.
For a Blind-Baked Pie:
- Adjust oven rack to lower-middle position and preheat to 350°F (180°C).
- Line pie shell that has been chilled for at least 2 hours with a large sheet of aluminum foil, pressing so it conforms to the curves of the plate (a second sheet of aluminum may be needed for full coverage).
- Fill to the brim with sugar, transfer to a half sheet pan, and bake until fully set and golden around the edges, 60 to 75 minutes.
- Fold long sides of foil toward the middle, gather short sides, and use both hands to carefully transfer sugar to a heat-safe bowl.
- Let sugar cool to room temperature.
- If needed, continue baking crust a few minutes more to brown along the bottom. A full explanation of this process can be found here.